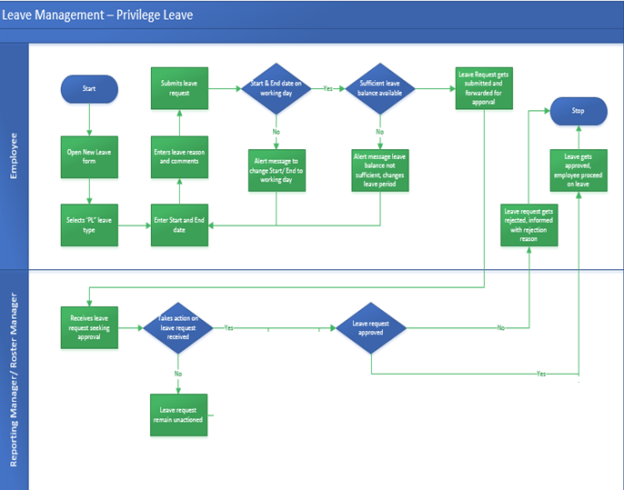
Leave Module Setup
To view the basic steps to setup Alt go to Module Setup page.
Following are the steps to configure Leave:
1. Master creation for Leave module.
I. Leave type creation & required module configuration
II. Creation of Leave reason, based on Leave type
III. Create group and mapping with leave entitlement policy
V. Leave Entitlement Configuration as per company policy
VI. Creation of Workflow & mail template configuration
VII. Required form configuration for leave module menus.
VIII. Creation of Employee group & their mapping with policies.
IX. Entries in “HR scheduler�.
The above steps are described in detail below:
1. Master Creation for Leave module:
We need to create below masters which is required to start leave module setup in Alt. Below mentioned category wise master needs to be created under Content Type. For details on how to create Content Type, click here.
a. Accrual Time Type
b. Gender
c. Entitlement Period Type
d. Leave Duration
e. RoasterType
I. Leave type creation & required module configuration
For Leave Type creation, click here.
Module configuration is required to setup application as per client's requirement which helps system to give desired output. For
list of module configuration of LEAVE module and their details, click here.
II. Creation of Leave reason, based on Leave type
Here, we create leave reasons and map with their leave types. These leave reasons appear while applying leave in application.
For details on how to create Leave Reason, click here.
III. Create group and mapping with leave entitlement policy
As required, we need to create group which helps to keep list of employees in a single group. Accordingly, we need to map these
groups with “Leave Entitlement Policy�. Based on these mappings, leaves get credited to employees as per company policies.
For mapping group with policy, click here.
IV. Create a default roaster
If client doesn’t opt for attendance module then we need to create default roaster which requires leave module setup. For creating
default roaster, follow these steps:
LOGIN to Alt Worklife with admin credentials and follow below steps to create roster.
Go to Leave -> Configuration -> Rosters
V. Leave Entitlement Configuration as per company policy
Leave entitlement configuration is very important step for leave module setup. Before entitlement configuration, you should
understand company’s leave policies which will help to setup. For more details on Leave Entitlement, click here.
VI. Creation of Workflow & mail template configuration
For creation of workflow, login to Alt Worklife as admin. After that follow these required steps to setup Workflow & mail notification.
a. Workflow Setup - For setting up workflow we need to first create the workflow. We can create the workflow by following below
mentioned steps:
1: Login with Alt Worklife as Admin, Admin > Configuration > Workflow.
2: Click on + sign to create the workflow.
3: Write the mentioned details:
i) Workflow Name: Leave
ii) Workflow Type: Leave
iii) Workflow stages setup: mentioned below
b. Stages involved in Workflow - Following are the stages present in Workflow of Leave:
I. Initial
II. L1 Approval
III. Rejected
IV. Leave Withdraw Approval
V. Leave Withdraw Rejected
VI. Completed
Note: First setup the Mail Templates that are required to be sent at different stages in the workflow.
Initial Stage:
a) Stage section: All fields are auto filled. These fields can be changed as per requirement
b) Stage Role Section: The roles who have Menu Permission (Refer STEP 2)
c) SLA Communication section: Not required in this stage
d) Workflow stage action section:
(i) Submit Action:
1. Action Type = Submit
2. Action Name = Submit
3. TransitionType = getdefaultRule
4. Is Visible = True
5. Transitions: To set Transitions you need to add all the stages of the Leave Workflow first.
(ii) Withdraw Action:
1. Action Type = Withdraw
2. Action Name = Withdraw
3. TransitionType = getdefaultRule
4. Is Visible = True
5. Transitions: To set Transitions you need to add all the stages of the Leave Workflow first.
(iii) Approve Action:
1. Action Type = Approve
2. Action Name = Approve
3. TransitionType = getdefaultRule
4. Is Visible = True
5. Transitions: To set Transitions you need to add all the stages of the Leave Workflow first.
L1 Manager Approval
a) Stage section: All fields are auto filled. These fields can be changed as per requirement
b) Stage Role Section: The roles who have Menu Permission (Refer STEP 2)
c) SLA Communication section: Not required in this stage
d) Workflow stage action section:
(i) Approve Action:
1. Action Type = Approve
2. Action Name = Approve
3. TransitionType = getdefaultRule
4. Is Visible = True
5. Transitions: To set Transitions you need to add all the stages of the Leave Workflow first.
(ii) Reject Action:
1. Action Type = Reject
2. Action Name = Reject
3. TransitionType = getdefaultRule
4. Is Visible = True
5. Transitions: To set Transitions you need to add all the stages of the Leave Workflow first.
(iii) Revert Action:
1. Action Type = Withdraw
2. Action Name = Revert
3. TransitionType = getdefaultRule
4. Is Visible = True
5. Transitions: To set Transitions you need to add all the stages of the Leave Workflow first.
Rejected
a) Stage section: All fields are auto filled. These fields can be changed as per requirement
b) Stage Role Section: The roles who have Menu Permission (Refer STEP 2)
c) SLA Communication section: Not required in this stage
d) Workflow stage action section:
(i) Resubmit Action:
1. Action Type = Submit
2. Action Name = Resubmit
3. TransitionType = getdefaultRule
4. Is Visible = True
5. Transitions: To set Transitions you need to add all the stages of the Leave Workflow first.
(ii) Withdraw Action:
1. Action Type = Withdraw
2. Action Name = Withdraw
3. TransitionType = getdefaultRule
4. Is Visible = True
5. Transitions: To set Transitions you need to add all the stages of the Leave Workflow first.
Leave Withdraw Approval
a) Stage section: All fields are auto filled. These fields can be changed as per requirement
b) Stage Role Section: The roles who have Menu Permission (Refer STEP 2)
c) SLA Communication section: Not required in this stage
d) Workflow stage action section:
(i) Approve Action:
1. Action Type = Approve
2. Action Name = Approve
3. TransitionType = getdefaultRule
4. Is Visible = True
5. Transitions: To set Transitions you need to add all the stages of the Leave Workflow first.
(ii) Cancellation Rejected Action:
1. Action Type = Reject
2. Action Name = Cancellation Rejected
3. TransitionType = getdefaultRule
4. Is Visible = True
5. Transitions: To set Transitions you need to add all the stages of the Leave Workflow first.
Leave Withdraw Rejected
a) Stage section: All fields are auto filled. These fields can be changed as per requirement
b) Stage Role Section: The roles who have Menu Permission (Refer STEP 2)
c) SLA Communication section: Not required in this stage
d) Workflow stage action section:
(i) Submit Action:
1. Action Type = Submit
2. Action Name = Submit
3. TransitionType = getdefaultRule
4. Is Visible = True
5. Transitions: To set Transitions you need to add all the stages of the Leave Workflow
first.
(ii) Approve Action:
1. Action Type = Withdraw
2. Action Name = Approve
3. TransitionType = getdefaultRule
4. Is Visible = True
5. Transitions: To set Transitions you need to add all the stages of the Leave Workflow
first.
Completed
a) Stage section: All fields are auto filled. These fields can be changed as per requirement
b) Stage Role Section: The roles who have Menu Permission (Refer STEP 2)
c) SLA Communication section: Not required in this stage
d) Workflow stage action section: Not required in this stage
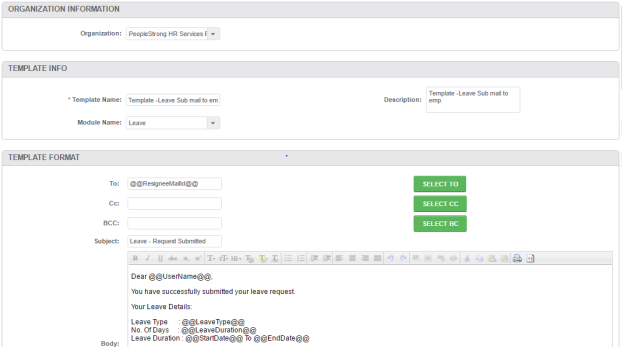
b. Mail Templates Setup:
Mail templates will be required to send email notifications for each and every transactions which are taking place in system
for leave. For this we need to create the mail templates by following below mentioned steps:
1. Login with Alt Worklife portal with admin credentials - Leave > Configuration > Communication Template.
2. Click on + sign to create the template.
3. Write the mentioned details:
i) Template Name: Leave
ii) Description: Leave
iii) Module Name: Leave (pfa screen shot for reference)
VII. Required form configuration for leave module menus.
For all leave menus, you need to do form configuration otherwise all forms will be blank.
VIII. Creation of Employee group & their mapping with policies.
Employee group creation is required for setting up holiday calendar. Need to follow these below steps:
a. Employee group creation & their mapping with Holiday Calendar policy.
You can create employee group by using required parameter which comes during employee group creation. And after
creation, you also need to map group (which has to be used for holiday config) with “CALENDAR-HOLIDAY-POLICY�.
b. Holiday master creation and employee group wise holiday assignment.
Here, user can define holidays as per their created employee group.
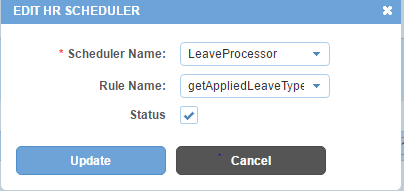
IX. Entries in “HR scheduler�.
This is nothing but an entry required for system to understand that system has to credit leave to their users for the organization as
per their company policies.


